The application of copper foil to the faceted glass is described below and illustrated in the following video:
I use 1/2 or 3/8″ 1.5mil copper foil depending on the thickness of the glass. Align the foil flush with the back of the glass which is flat and smooth it with a hard plastic fid. You can extend the foil beyond the back edge of the glass and fold it over as done with sheet glass but it will result in a thicker lead line and is not necessary for the strength of the panel
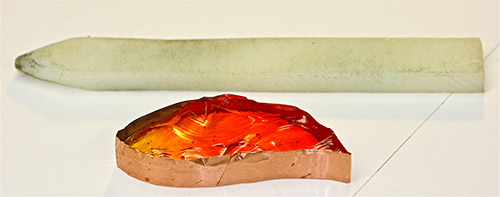
Fid shown with 1/2 inch foil applied to a piece of faceted glass. Trim the excess foil flush along the faceted edge of the glass using a 6 1/2 ” curved Mayo scissors ( inexpensive and readily available on the internet ) I have found that a solid pair of curved scissors is best suited for this function.
The assembly of the flower is described below and also illustrated in this video:
Check to be sure that the next piece fits closely to the previously foiled piece and then foil and trim it as described above. Solder the pieces together one at a time as illustrated below. I usually hold the pieces in position for soldering with small weights and pins. I am not sure about the toxicity of the soldering fumes but they are quite unpleasant so I use an exhaust system utilizing the tubing made for clothes dryers driven by a standard bathroom exhaust fan which vents to the outside. The nozzle to the system is visible on the right.
One problem that is common when soldering the front sides to two pieces of faceted glass is that if the opposing edges are different thicknesses the solder may pool along the solder line. The greater the difference in thickness the greater the chance of pooling. Since this is often a problem, if the pieces of faceted glass are part of a single element such as the flower, I assemble all of the parts before placing them into the panel. This permits me to hold the entire piece in different positions facilitating the removal of the pooled solder with the soldering iron and gravity. Be careful to keep the molten solder away from your hands and feet.
It is important, as with a standard foiled panel, to carefully remove any flux from the foiled surfaces of the faceted glass. You can use your favored cleaning agents, wax and patina.
The finished soldered faceted flower is shown below. Note that some of the solder lines are irregular due to the unevenness of the adjacent edges as described above.
This is an image of the soldered back flat side of the flower.
I have experimented with the use of both clear and opaque epoxy to attach the pieces of faceted glass. I found that the end result did not look any better than the foiled glass and the fitting of the pieces needed to be more precise to reduce the gaps between the pieces. In addition the outer edges of the glass still needed to be foiled in order to attach the faceted glass to the sheet glass. It was, in the end, more labor intensive than using foil alone. An opaque fast setting epoxy was used to hold the faceted sections of both Chambered Nautilus #1 and #2 together. In the hands of experienced artists I suspect that complex shaped pieces of faceted glass, similar to the ones used in my work, could be meaningfully incorporated into more traditional faceted glass works.


